How to make thermal drapes
 The heat wave this past week really got to me. We don’t have air conditioning in our home, and even if we did, it would be great to insulate our windows to reduce the load on the a/c units and power supply. That’s why I got busy yesterday on a project I’ve meant to do for quite some time: making insulated drapes.
As climate change’s weather weirdness intensifies, we’re likely to get MORE of these intense heat days. So now is the time to begin preparing your home. Plan for hotter in everything you do, from which fruit tree varieties you plant, to what drapes you choose, to installing awnings and shade sails. In the coming decades, temperatures will go up! (Here are more low-tech things you can do to prepare your home for heat)
You can buy thermal drapes online, but they’re heavy, saturated with some kind of weird plastic, and they look like a throwback to the 1970s. And they’re expensive. No thanks.
I wanted more interesting fabrics, and a lower sticker price. Luckily, there are several stores nearby which sell end-lots of upholstery-weight fabric. (A fun one is Fabric Planet on Lincoln Blvd. in L.A. They also have it at -urk- Joann’s).
The thermal drape I make is like a sandwich: decorative fabric, thermal barrier, and liner fabric.
What you’ll need
Fabrics: I measured my windows like 20 times, and calculated my material. I bought upholstery fabric (a.k.a. decor fabric) for the room side, and inexpensive muslin for the window side. If you want something more interesting than muslin, remember that whatever you place against the window glass side will fade quickly in our So Cal sunshine. When you choose the decor fabric, don’t select the heaviest stuff they sell. That is for chair seats and couches. You want something from the decor section that is of the lighter weights. But it will still feel more like “canvas” in your hand than anything you’d choose as a dress fabric. Although you could probably do this project with the lightweight quilter’s cotton prints, I haven’t done so, and I would imagine some of the sparkle of the foil might show through.
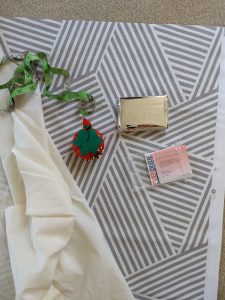
Thermal: The thermal ingredient is one of those reflective emergency blankets. You can get them online or at an emergency supply store (try the Surplus Store at Venice and Motor in L.A.). If your windows are large or odd-sized, you may need two blankets. The measurements of my blanket “fabric” were printed on the label.
Other supplies: In addition to standard sewing supplies, you will also need a pack of large-size safety pins. And you’ll need your standard curtain rod. I like the kind that are a simple rod with sliding rings. These days you can get rings with a clip hanging from them, which makes installation easy, and also allows you to take the drapes down periodically to wash them. (rods & rings available many places including: Pottery Barn, Cost Plus, Home Depot, Joann’s)
The basic design
I said it was like a sandwich. You could also visualize it like a pillowcase, hanging from the drapery rod with the opening at the bottom. The reason you need the opening is the emergency blanket must be removed before you wash your drapes. I didn’t want to have to remove stitching in order to do this, so I designed an open pocket.
Here was my basic design:
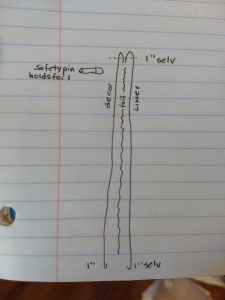
“Selv” in the drawing is my abbreviation for selvage or seam allowance.
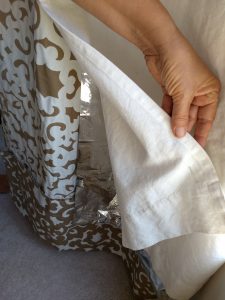
The foil is not sewn in. I slide it into the pocket at the very end, and safety-pin it into place. Here is a photo from another, finished drape.
With this design, you do get a bit of a “crinkle” sound when the wind blows the drapes. But it really does cut the heat that used to pour into the building through the glass.
Your finished drape will have “body.” It will not be filmy and flowy like a sheer drape. It is, after all, a lined drape, so it will behave like one. What that means is that for a full-length drape, plan for it to clear your flooring, not pile up on the floor like you see in some home fashion magazines these days. A lined drape won’t do the pile-up thing very gracefully.
How-to
I laid out my fabric and cut it to measure. This part is just the same as making ordinary drapes. You need to allow your fabric to extend beyond the edges of the window at top and bottom (the one I made yesterday extends 5″ above the window, and 6″ below).
If you are using a pocket-style drapery rod, you will need to allow fabric to create the pocket. That did not apply to me.
I typically make drapes 1.25 to 1.5 times the window width so that they have some pleasant fullness when closed, but aren’t too bulky when open.
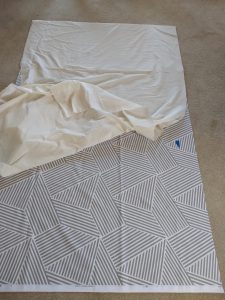
Lay out your decor fabric, and then lay out your liner fabric.
I find it easiest to make the liner the same size as the decor panel, and truly sew a “pillowcase” shape. This allows you to fold the fabric’s rough edges inside, where they don’t need to be finished. I have, however, made drapes in the past where the liner was smaller than the decor panel. (I did this once to upcycle commercially-made cotton “sheer” panels as the liner)
All your rough edges and seam allowances (and seams, if you had to sew fabric panels together to make a piece big enough to cover a large window) should be turned to the inside of your “pillowcase.” In the photo, I’m laying out the liner fabric over my decor fabric, with right sides together, just prior to sewing the “pillowcase” edges.
Remember, the opening to your “pillowcase” needs to be at the bottom. It needs to point toward the floor.
Once your “pillowcase” is complete, if you wish to do any ironing, this is the time to do it. You cannot iron your project after you add the foil insulator, because the polyester insulator may melt.
Adding the thermal barrier
Now it’s time to add the foil insulator. Turn your “pillowcase” inside out, and lay it out with the liner side up. The wrong side of your liner should be visible.
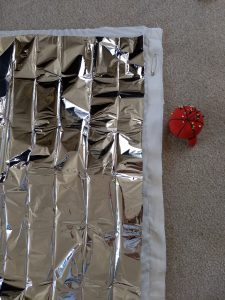
Cut your foil .5″ to 1″ smaller (on all sides) than the size of the pocket of the “pillowcase.” Plan for the foil to fit loosely and easily inside. If you make the foil too big, it will form lumpy bulges and your drape will not lie flat.
Lay the cut foil on top of the afore-mentioned inside out “pillowcase,” which means the foil is in direct contact with the wrong side of the liner fabric.
Now is when you’ll need those large safety pins. Use the biggest ones you can find. The reason you don’t want small ones is that over time the foil may rip. If the holes are far enough apart, your foil will last longer before the corners tear off.
I install the corners first. I place the corner pins at an angle. You want to pierce the foil, and pick up a good bit of liner fabric, but not pick up any decor fabric in your safety pin. Once you get the hang of it, it’s very easy. (it’s just tough to explain in writing!)
I put pins across the top edge, spaced at about 10″ to 12″ apart, at about 4″ to 6″ setback from the edge of the foil. I usually put a pin at each bottom corner as well, with similar setback. On a full-length drape I might put a pin halfway down the side edges. You don’t want your pins too close to the foil edge (reference the discussion of ripping, above).
Once all your pins are installed, carefully turn your “pillowcase” right-side-out. Now you can install your clip-rings, or whatever drapery hardware you are using.
This is what the liner side looks like. The large safety pin is visible, however in most cases this pin will be against your wall, above or below your window, so no one will see it.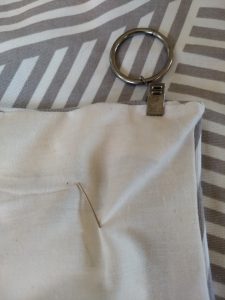
Now you can hang your finished drapes and enjoy!
