How do you get rid of Bermuda grass?
 Many popular garden books promote methods such as the “Lasagna method”: You layer materials such as cardboard, black plastic, compost, mulch, etc., on top of grass and create a garden. In Southern California we must evaluate such recommendations carefully:
-
Does the person who is telling of great Lasagna success live in a year-round growing season, or do they have the benefit of a frost to help eradicate weeds and pests?
-
Does the storyteller have Bermuda grass (Cynodon dactylon)?
-
Are they speaking of long-term success: Have their observations endured beyond Bermuda’s regrowth timespan or were those Lasagna layers very recently applied?
Here in Southern California, without frost of any significance and with nearly every backyard being populated with Bermuda grass, in my experience there is only one long-term viable solution:
dig, dig, dig some more, and plan to dig again.
Lasagne layers won’t work
Low-till methods like the Lasagna layering don’t work because deep underneath all those layers, the highly persistent Bermuda will lurk – yellowed and bleached, but still very much alive. When given half a chance, this invasive monster will tunnel up through any holes it can find in the barriers (it can create such holes) to take over your new patch with gusto. Ultimately, you’ll still have to dig.
Black plastic won’t work
Some people misguidedly recommend black plastic sheeting, a technique called “solarizing.” The hot Southern California sun heats the black plastic and bakes every living thing in the soil. Solarizing, when properly used, is a last ditch “bring in the big guns” technique for dealing with insurmountable infestations of soil pests such as root-knot nematodes. Solarizing annihilates all your soil life, after which you have to rebuild everything. Meanwhile, Bermuda stolons will patiently persist, withered and white, just waiting for a hint of water and cooler temperatures. They’ll thank you for removing all the competition and reward you with abundant regrowth.
Chemicals won’t work
You might tell yourself you’ll use chemical methods like Roundup “just once,” and then return to organics. You’re kidding yourself. Bermuda will lurk under the edges of the nearest concrete and come out again, demanding that you reapply chemicals again and again. Meanwhile, each time you reapply those chemicals, you must rebuild your decimated soil life all over again.
No-Till Won’t work
Some gardening manuals advocate “no till” methods. When we consider such things as the long, delicate, microscopic threads of the mycorrhizal fungus which create vast webs throughout our soils, “no till” sounds like a really fine idea. But pure “no till” isn’t a realistic option for a new garden on a site with Bermuda grass and no hard frosts.
What Does work …
In ecosystems there is a phenomenon called succession. Ecosystems reestablish themselves beginning with their “foundational species.” This can be observed in the rainforests when they clear-cut the trees: certain “weed species” will flourish in the naked gaps. These “weed trees” serve a purpose in nature, sheltering the babies of other species while the long-term canopy becomes reestablished.
A similar phenomenon occurs in the wilds of your backyard: Bermuda is an invasive exotic that has fit into the niche of a foundational species. Each time you eradicate it, it will return in force. In order to ultimately triumph, you will have to push your garden’s mini-ecosystem past the “foundational” stages and into more advanced stages so that your soil life becomes more developed and complex.
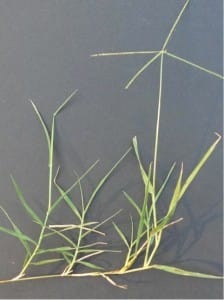
How to remove Bermuda grass
Be prepared to dig and redig. Dig out every little tiny bit, every single white stolon. In the months & years that follow, each time you see a Bermuda sprout, dig it out in its entirety, including the white stolon. When you pull out a long white stolon intact & unbroken, celebrate your victory.
At the Community Garden at Holy Nativity, we removed the Bermuda by digging and cutting it out, then raking to eliminate all the stolons that we could. Then we watered the bare soil to stimulate resprout, and dug out more hidden Bermuda. Only after all of this did we till the garden area by using a rototiller. For the next two years, every time we saw a hint of Bermuda we carefully dug it out to extract the source stolon.
Here’s the Bermuda weeding technique we’ve developed over the years: 2 or 3 days prior to your workday, use a garden fork held vertically and poke many holes into the soil across the target area. Then water the area well. The holes will help water to penetrate. On your workday, begin with the garden fork. Plunge it into your water-softened soil to full tine depth and rock back on the fork. You may hear and feel the Bermuda stolons ripping through the soil. Then it’s time to get down and dirty with a hand tool. Reach deep into the loosened soil to grab Bermuda stolons and remove all bits of the grass.
Pull each stolon out and discard it carefully. Don’t try to compost Bermuda, particularly if you have large quantities of it. Over time as your soil texture improves, you’ll find that you can use your hand tool to loosen the soil around the Bermuda stolons, then gently persuade those long white monsters out of the soil without severing them.
Never use a rototiller prior to Bermuda grass removal – you will simply make your Bermuda problem worse by chopping it up. Each tiny bit will resprout!
Bermuda Grass Containment in a Frost-Free Area
Use physical barriers. When you’re cutting an edge between garden and lawn, choose the widest barrier you can possibly find. For the Community Garden we used a plastic edging product that was perhaps 6” wide. The wide barrier will slow how quickly the Bermuda invades, and will make it easier to dig it out of your growing area.
Grow great soil. I’ve noticed that the better my soil gets — the richer, the fluffier — the easier it is to pull out the long pieces of invading Bermuda. (Big hidden benefit: By growing great soil life populations, you participate in one of the cutting-edge solutions to global warming!)
Shade helps. Biointensive spacing, as described by John Jeavons in How To Grow More Vegetables, is designed so that the foliage of one mature plant touches the foliage of its neighbor, so the soil is shaded. In shade, Bermuda grows spindly and is easier to remove.
Mulch helps. When Bermuda has to grow up through mulch, it doesn’t cling to the soil very well and is easier to remove. Plus the soil texture beneath the mulch is vastly improved, making it much easier to tease the Bermuda stolons out of the soil with a hand tool. In one particular test bed at the Emerson Avenue Community Garden, I mulched very heavily (4 to 6”) and conscientiously dug Bermuda at each month’s work day. At first, there was plenty of resprout, but over time the Bermuda has very significantly slowed its efforts at regrowth.
Spot irrigation helps. In large perennial beds, while your shrubs and trees are getting established, water only where the plants are. That way, the Bermuda can’t thrive between the juvenile plants.
If you enjoyed this post, please consider making a small donation to support my ongoing work. — thanks!
